The Form Outputs Tab
The Form Outputs tab displays the Data Destinations![]() A Data Destination specifies where to send data from a submitted form. You can use Data Destinations to automate data sharing and storage, routing data to a specific service (such as email or cloud storage) in several different formats. and Documents associated with current or previous form versions. You can edit these outputs to send previously submitted data to additional destinations or documents. This topic describes how the Form Outputs tab works and how to add destinations and documents to a previous form version.
A Data Destination specifies where to send data from a submitted form. You can use Data Destinations to automate data sharing and storage, routing data to a specific service (such as email or cloud storage) in several different formats. and Documents associated with current or previous form versions. You can edit these outputs to send previously submitted data to additional destinations or documents. This topic describes how the Form Outputs tab works and how to add destinations and documents to a previous form version.
Available on all tiers:
Contents
How the Form Outputs tab works
On the Form Outputs tab, you can:
- Link Data Destinations to the form. Data Destinations control where submitted forms are sent.
- Link Documents to these Data Destinations.
- Link additional downloadable Documents to the form. These Documents aren’t sent anywhere but are downloadable from the:
- Web Portal
- Sent and Search lists in the TrueContext Mobile App
- TrueContext REST API
Info:The topic Add a Destination describes how to add a destination to create a new form version. This applies the destination to new—not past—form submissions.
Add Data Destinations to a form version
This section describes how to link Data Destinations to an existing form version and how to choose the Documents attached.
Link Data Destinations to previous form versions
When you link Data Destinations to a form version, you can resend the data from all previously submitted forms of that form version. This data is sent to the new Data Destination![]() A Data Destination specifies where to send data from a submitted form. You can use Data Destinations to automate data sharing and storage, routing data to a specific service (such as email or cloud storage) in several different formats.. Existing Data Destinations are not triggered.
A Data Destination specifies where to send data from a submitted form. You can use Data Destinations to automate data sharing and storage, routing data to a specific service (such as email or cloud storage) in several different formats.. Existing Data Destinations are not triggered.
Note:Be careful if you add an email destination to a previous form version—the recipients could receive thousands of emails.
To link a Data Destination to a previous form version:
-
From the Forms & Integrations menu, navigate to the form you want to set up.
-
Select FormName > Version History.
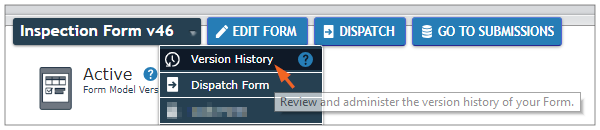
Result: The system displays a list of the current and previous versions of the form.
-
Select a form version.
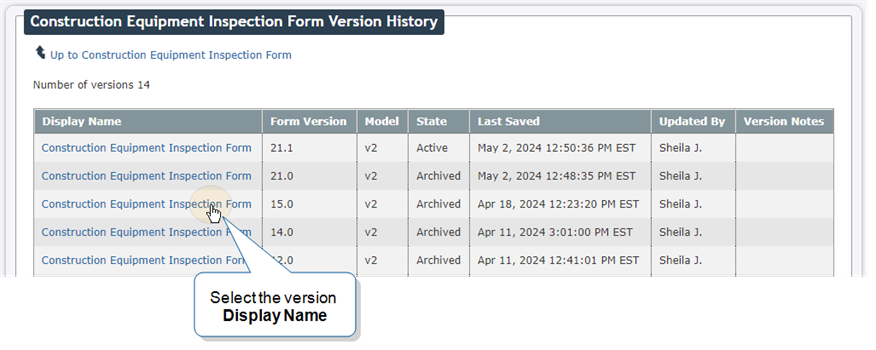
Result: The system displays the Form Diagram for the selected version.
-
Select Form Outputs, and then select Edit Form Outputs.
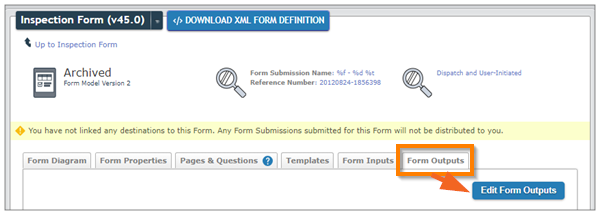
Result: The system displays the Edit Form Outputs page.
-
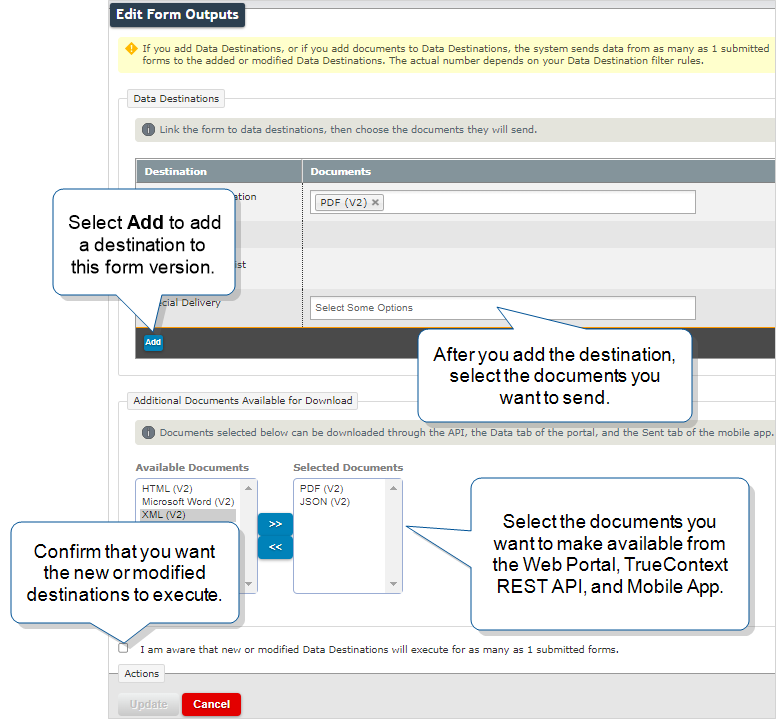
In the Data Destinations section, select Add, and then select a Data Destination. Repeat for additional destinations.
-
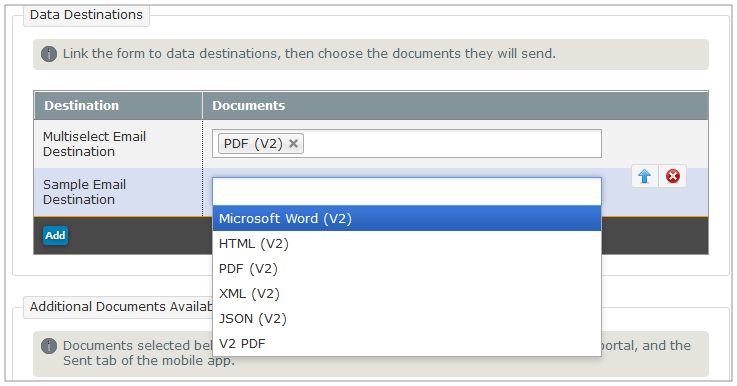
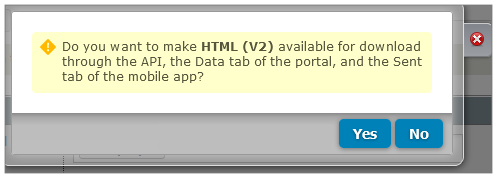
Select the Documents you want to link to each destination.
Result: If the document you selected isn’t already available for download, the system prompts you to choose whether to make it available.
Info:When you attach a Multi-Language Document
 A Multi-Language Document is an output Document connected to a Multi-Language Form. You can generate the Document in any of the languages configured in the form. The Document uses the form's translation files to translate headings, question text, and other content. to a Data Destination, you can select languages for the document files. The topic Steps to attach a Multi-Language Document to a Data Destination describes the language options in more detail.
 -
In the Destination Execution Strategy section, select if you want to resend data from previously submitted forms to any new or modified Data Destinations.
-
Do you want to make additional documents available for download?
-
If yes, select documents from the Selected Documents dropdown list.
-
If no, go to the next step.
-
-
Did you choose to resend data from previously submitted forms in step 7?
-
If yes, select the checkbox to confirm that you’re aware that new or modified destinations will execute for the stated number of form submissions.
-
If no, go to the next step.
-
-
Select Update.
Link Documents to a Data Destination
Data Destinations send the Documents linked to them when they are triggered.
To link a document to a Data Destination:
-
From the Forms & Integrations menu, navigate to the form you want to set up.
-
Select FormName > Version History.
Result: The system displays a list of the current and previous versions of the form.
-
Select a form version.
-
Select Form Outputs, and then select Edit Form Outputs.
Result: The system displays the Edit Form Outputs page.
-
In the Data Destinations section, in the Documents column, select one or more documents to link to a destination.
Info:When you attach a Multi-Language Document to a Data Destination, you can select languages for the document files. The topic Steps to attach a Multi-Language Document to a Data Destination describes the language options in more detail.
-
If you also want to make a Document available for download, choose to add the document type to the Additional Documents Available... list.
-
Repeat for each Data Destination that supports Document storage.
The following table describes the Data Destinations that support or require a document.
Requires a Document Can have a Document, but is not required Not compatible with Documents Microsoft SharePoint Server Amazon S3 Google Sheets Salesforce Apex REST Box Dispatch WebDAV (HTTP PUT or PATCH) Customer Feedback Microsoft SharePoint List Dropbox SMS Email FTP/Secure FTP Google Drive HTTP HTTP File Upload Microsoft OneDrive Microsoft OneDrive for Business Microsoft SharePoint Document Library Salesforce (except Apex REST) ServiceNow Table Tip:You can link a single Document to multiple Data Destinations.
-
In the Destination Execution Strategy section, choose if you want to resend data from previously submitted forms to any new or modified Data Destinations.
-
Did you choose to resend data from previously submitted forms in step 8?
-
If yes, select the checkbox to confirm that you’re aware that new or modified destinations will execute for the stated number of form submissions.
-
If no, go to the next step.
-
-
Select Update.
- Note:
-
When a Data Destination with new Documents re-executes, it will also resend copies of any previously linked Documents.
-
Be careful if you link new Documents to an email Data Destination. The recipients could receive thousands of emails.
-
Reorder or unlink Data Destinations
When a form is submitted, linked Data Destinations trigger in the order they are listed on the Form Outputs tab. Data Destination executions operate independently of each other. If the first destination fails, the other destinations can still execute.
You might want to reorder the list if your Salesforce or HTTP destinations store response outputs.
To reorder the Data Destinations linked to a form, hover over a Data Destination. Three icons will display on the right.
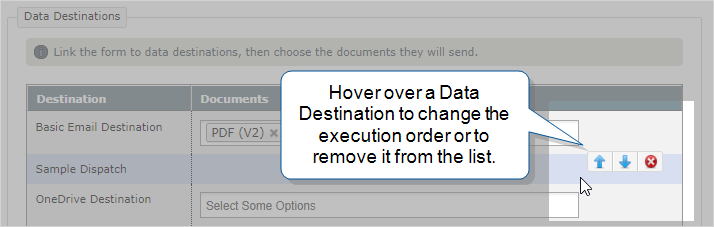
Use the up and down arrows to move the Data Destination through the list.
To remove the destination, select the delete icon. This removes the Data Destination from any future form submissions of that form version.
Note:Users can still submit forms to the removed Data Destination until they reconcile the Mobile App.
Additional Documents available for download
When you make a Document available for download, once a form is submitted you can download attached Documents from the following sources:
-
Through the TrueContext REST API.
-
From a form submission details page in the Web Portal.
-
From the Sent and Search lists in the Mobile App.
Tip:You can link these Documents to Data Destinations if you also want them to be available in your third-party systems.
Select Documents from the Selected Documents dropdown list to make them available for download.