Handlebars Documents
Available on the Advanced and Enterprise tiers:
Contents
About
The Handlebars document allows you to build custom documents. For example, you could build a custom CSV format, or even a KML file. You can also add loops or conditions to control how the document behaves in different scenarios, based on the data in a form submission.
If you are looking to build a custom PDF, Word, or HTML document, use those document types instead; Handlebars can be used to customize the layouts of those documents.
Like all documents in TrueContext, Handlebars documents can be sent to cloud and enterprise services, web services, and more. A number of document types are available, and multiple documents can be sent with a single form submission. Read more about documents here.
Document Basics
-
Create the document, and select Handlebars as the document type.
-
Name the document, and optionally provide a description.
-
Keep the document identifier that was added based on the name, or type in a different identifier.
-
Use a DREL
 Data Reference Expression Language (DREL) is used to get form data and metadata and add it to a string, such as dates, usernames, or answers to questions in forms. expression to configure a document Filename. This name applies to all instances of the document, including downloaded documents and documents sent by Data Destinations.Tip:A recognizable file name can help you quickly search for and identify files when:
You download files from multiple form submissions so that you can work locally.
You or your customers receive multiple messages generated by Email Destinations.
-
Choose a Document Timezone source.
-
Team Preference Setting—Displays times using the Team Time Zone. This applies to the
shiftedtime and not theprovidedtime. -
Form Submission—Displays times using the device time zone.
Note:The device time zone refers to the device setting, not the user profile locale settings in the TrueContext Mobile App account details.
-
Custom—Choose a time zone. Custom time zones apply to the
shiftedtime and not theprovidedtime.
-
-
Optionally auto-link the document to forms.
Configuration
Data Node Format
This setting changes how the nodes containing question/answer information are named.
Choose one of the following options:
-
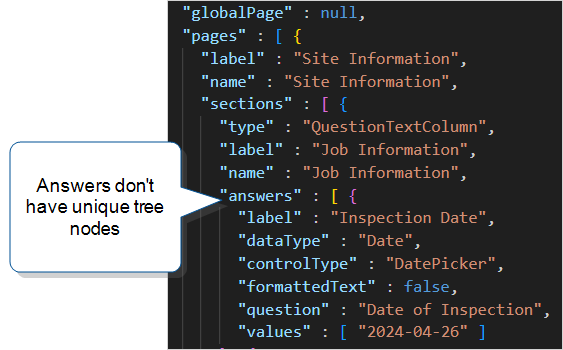
Standard—This option provides the form elements in an array that you can loop over. Use this option when you want to apply generic logic to all elements of your form.
-
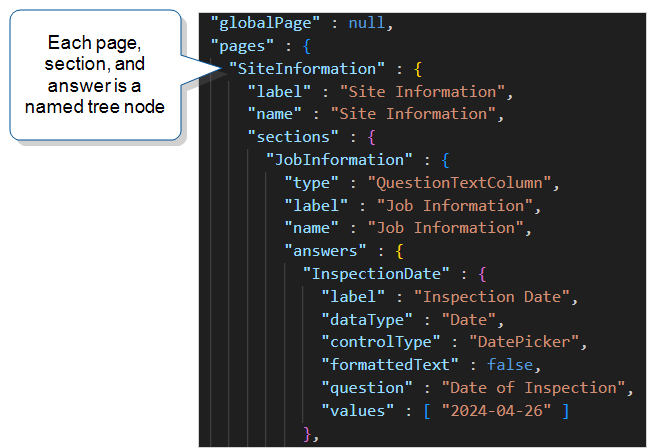
All Labels as Node Names—Uses the page, section, and answer unique IDs (labels) instead of the generic names.
Tip:This option gives you precise labels you can use to reference specific nodes in the submitted record. Use this option when you want to place specific answers in specific places in your template output. The examples in this topic all use this setting.
-
Flat Answer List—Changes the hierarchical tree structure into a flat data structure (list). Use this option when you want to loop over answers and don’t need to reference the full form structure (pages, sections, or Repeatable Sections).
File Extension
The document can be any text-based file type (HTML, .txt. .xml, etc). This is the file type the document will create.
Content Type
Leave this blank for automatic resolution based on file extension.
Handlebars Template
Supply the document body, using Handlebars to reference answers from your form submission. . The following topics provide more information about how to format a Handlebars template:
- Handlebars - Basic Question References
- Handlebars - Form Submission Metadata References
- Handlebars - Date and Time Formatting
- Handlebars: Advanced Question References
- Handlebars - Advanced: How to Print out All Questions/Answers in a Regular Section
- Handlebars - Advanced: How to Print all Repeatable Section Entries in a Table
- Handlebars - Conditions
- Handlebars - Advanced: How to Conditionally Include Answers
- Handlebars - Advanced: How to Add Conditional Formatting
Tip:Remember to format your template according to the content type. If you want to generate an XML document, be sure to format it correctly in XML.
Info:We recommend that you escape the data to ensure that the system generates the documents in a valid format.
Info:When you save a document, the system creates a new version of the template and stores that version for 45 days. This helps you to quickly download a previous version if your current version isn’t working as expected.


