Post a Slack Notification using the HTTP Data Destination
Available on all tiers:
This recipe shows you how to configure an HTTP Data Destination![]() A Data Destination specifies where to send data from a submitted form. You can use Data Destinations to automate data sharing and storage, routing data to a specific service (such as email or cloud storage) in several different formats. to post a Slack® Notification when a user submits a form. Depending on your configuration, Slack notifications can include data from submitted forms.
A Data Destination specifies where to send data from a submitted form. You can use Data Destinations to automate data sharing and storage, routing data to a specific service (such as email or cloud storage) in several different formats. to post a Slack® Notification when a user submits a form. Depending on your configuration, Slack notifications can include data from submitted forms.
Contents
Prerequisites
-
You must be a TrueContext Admin user.
-
You must have permissions to create and install Slack apps in your Slack workspace.
Tip:Check with your Slack Workspace Owner to verify your workspace permissions.
High-level process
When a user submits a form, the Data Destination makes a request to post a Slack notification. The notification includes a Request Body that you configure as a Document.
| System | Action | Result |
|---|---|---|
| Slack | Create a Slack app that has an Incoming Webhook. |
The Webhook |
| TrueContext | Create an HTTP Connection. | The Connection uses the Incoming Webhook to link TrueContext with your Slack app. |
| Create an HTTP Data Destination. | When the Data Destination executes, it sends a request to the Slack app to post a notification. | |
| Configure a Document with a Request Body. | The document includes a Request Body formatted according to Slack requirements. The Request Body defines the information from the submitted form to include in the notification. | |
| Link the Data Destination and the Document to your form. | When a user submits the form, the Data Destination makes a request to post a Slack notification. The notification includes the Request Body from the Document. |
Create a Slack app that has an Incoming Webhook
In Slack,
-
Enable Incoming Webhooks
 A Webhook is an HTTP endpoint that an external system exposes to receive data automatically. You can configure an HTTP Data Destination to send form submission data or Documents to a third-party system's Webhook URL, such as posting a notification to Slack when a user submits a form. on your app (Incoming Webhooks > Activate Incoming Webhooks).
 -
Create an Incoming Webhook:
-
Select Add New Webhook to Workspace.
-
Select the channel where you want to post notifications from TrueContext.
-
Select Allow.
-
-
Copy the Webhook URL to use when you create your TrueContext HTTP Connection.
Info:The Slack topic Sending messages using Incoming Webhooks describes how to create a Slack app and an Incoming Webhook in more detail.
Create an HTTP Connection that includes the Webhook URL
-
Go to Forms & Integrations > Connections > CREATE CONNECTION > HTTP Connection.
-
Enter a Name.
-
Select the FormSpaces in which you want to use the Connection.
-
Under Base Connection URL, paste the Webhook URL from your Slack app Incoming Webhook.
-
Select Anonymous Access.
-
Select Create to save your Connection.
Info:The topic HTTP Connection describes how to configure an HTTP Connection in more detail.
Configure an HTTP Data Destination to post a Slack notification
-
Go to Forms & Integrations > Data Destinations > CREATE DATA DESTINATION > HTTP.
-
Enter a Name and a Destination Unique Identifier.
-
On the Connection tab, select the HTTP Connection you created.
-
On the Request Configuration tab, select POST as the HTTP Method.
-
Select Create to save your Data Destination.
Info:The topic HTTP Data Destination describes how to configure an HTTP Data Destination in more detail.
Configure a Document with a Request Body
To post a Slack notification using your Incoming Webhook, you need a message formatted according to Slack’s base structure. The message contents must be formatted as a JSON object. Once you have the contents of your message, you add them to a TrueContext Document that you link to your Data Destination. The Document can reference data from your submitted forms using DREL![]() Data Reference Expression Language (DREL) is used to get form data and metadata and add it to a string, such as dates, usernames, or answers to questions in forms., FreeMarker, or Handlebars.
Data Reference Expression Language (DREL) is used to get form data and metadata and add it to a string, such as dates, usernames, or answers to questions in forms., FreeMarker, or Handlebars.
Tip:Use the Slack Block Kit Builder to preview your message contents.
-
Go to Forms & Integrations > Documents > CREATE DOCUMENT.
-
Select a document type from the Template-driven Text Documents. You can select DREL, FreeMarker, or Handlebars.
Result: The system opens a new Document in edit mode.
-
Fill in your Document Basics and Configuration.
Info:The following topics describe in detail how to configure each document type: -
Include the Request Body formatted according to Slack requirements in the following sections:
-
DREL documents—in the DREL Template section.
-
FreeMarker documents—upload an FTL file in the FreeMarker Template section.
-
Handlebars documents—in the Handlebars Template section.
Info:We recommend that you escape the data in the Request Body. This ensures that the system generates a valid JSON document.
The following example shows a DREL Document with a Request Body formatted according to Slack requirements.
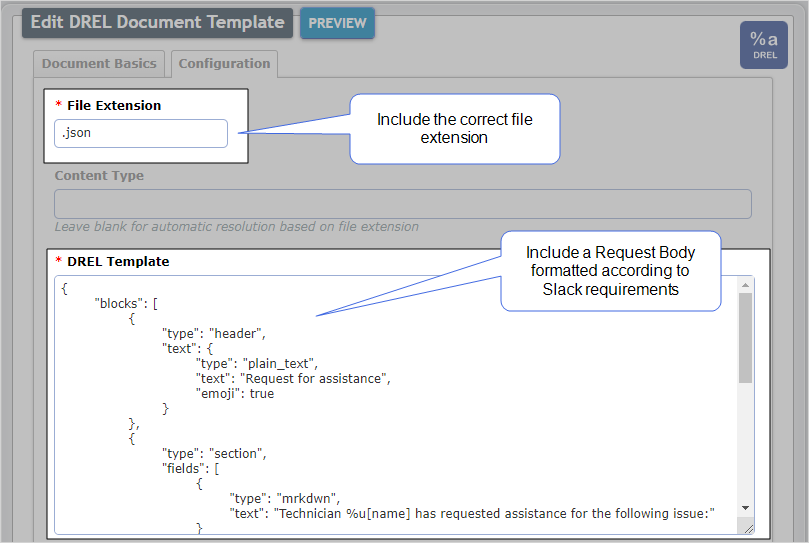
Note:The Document File Extension must be
.json. -
-
Select Create.
Result: You created a Document with a Request Body that posts a Slack notification with data from submitted forms.
DREL Request Body examples
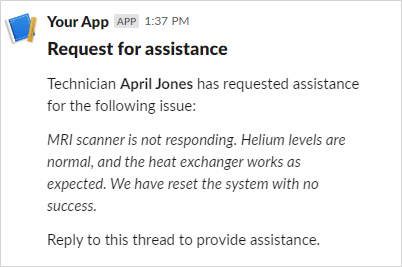
Request for assistance
The following example shows a Slack notification to request assistance from other members of the company.
- Notification
-
- Request Body
#c[escapeJson] { "blocks": [ { "type": "header", "text": { "type": "plain_text", "text": "Request for assistance", "emoji": true } }, { "type": "section", "fields": [ { "type": "mrkdwn", "text": "Technician *%u[name]* has requested assistance for the following issue:" } ] }, { "type": "section", "fields": [ { "type": "mrkdwn", "text": "_%a[IssueDescription]_" } ] }, { "type": "section", "fields": [ { "type": "mrkdwn", "text": "Reply to this thread to provide assistance." } ] } ] }-
Where:
-
#c[escapeJson]escapes the data in the Request Body to ensure the system generates a valid JSON document. -
%u[name]populates the First and Last name of the technician who submitted the form. -
A question with the Unique ID
A Unique ID refers to the specific identifier of a question, form page, form section, or Data Destination. Unique IDs are used as reference points when pulling data for conditional logic, Analytics projects, Data Destinations, and Documents. IssueDescriptionpopulates part of the text in the Slack notification.
-
New sales opportunity
The following example shows a Slack notification for a new sales opportunity.
- Notification
-

- Request body
#c[escapeJson] { "blocks": [ { "type": "header", "text": { "type": "plain_text", "text": "New Sales Opportunity", "emoji": true } }, { "type": "section", "fields": [ { "type": "mrkdwn", "text": "A new <https://yourcompany.lightning.force.com/lightning/r/Opportunity/%o[CreateOpportunity][id]/view|sales opportunity> has been identified for the account <https://yourcompany.lightning.force.com/lightning/r/Account/%a[ID]/view|%a[CustomerName]>." } ] }, { "type": "section", "fields": [ { "type": "mrkdwn", "text": "The following details were provided: \n\n _%a[OpportunityDetails]_" } ] } ] }- Where:
#c[escapeJson]escapes the data in the Request Body to ensure the system generates a valid JSON document.The notification includes links that direct users to Salesforce records.
%o[CreateOpportunity][id]populates the ID of the Opportunity record that the submitted form created.Note:To use
%o, you must configure a Salesforce Data Destination to create a record and store the response output.A question with the Unique ID
IDpopulates the Account ID in the Salesforce URL.A question with the Unique ID
CustomerNamepopulates the displayed customer name.A question with the Unique ID
OpportunityDetailspopulates the details provided by the user when they submitted the form.
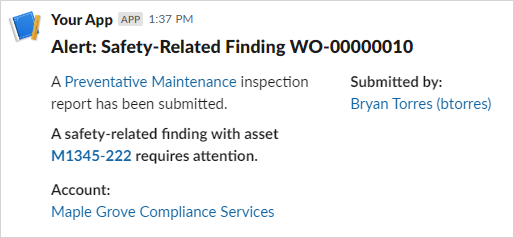
Security risk
The following example shows a Slack notification for a security risk.
- Notification
-
- Request body
#c[escapeJson] { "blocks": [ { "type": "header", "text": { "type": "plain_text", "text": "Alert: Safety-Related Finding WO-%a[WorkOrderNumber]", "emoji": true } }, { "type": "section", "fields": [ { "type": "mrkdwn", "text": "A <https://yourcompany.lightning.force.com/lightning/r/ProntoForms__ProntoForms_Submission__c/%o[ProntoFormsSubmission][id]/view|Preventative Maintenance> inspection report has been submitted.\n\n*A safety-related finding with asset <https://yourcompany.lightning.force.com/lightning/r/Asset/%a[AssetId]/view|%a[SelectedEquipmentID]> requires attention.*" }, { "type": "mrkdwn", "text": "*Submitted by:*\n<https://yourcompany.lightning.force.com/lightning/r/ServiceResource/0Hn1I000000M0mySAC/view|%u>" } ] }, { "type": "section", "fields": [ { "type": "mrkdwn", "text": "*Account:*\n<https://yourcompany.lightning.force.com/lightning/r/Account/%a[ID]/view|%a[CustomerName]>" } ] } ] }- Where:
#c[escapeJson]escapes the data in the Request Body to ensure the system generates a valid JSON document.The notification includes links that direct users to Salesforce records.
%o[TrueContextSubmission][id]populates the ID of the TrueContext Submission record that the submitted form created.Note:To use
%o, you must configure a Salesforce Data Destination to create a record and store the response output.A question with the Unique ID
AssetIdpopulates the Asset ID in the Salesforce URL.A question with the Unique ID
SelectedEquipmentIDpopulates the displayed equipment ID.%upopulates the name and username of the user who submitted the form.A question with the Unique ID
IDpopulates the Account ID in the Salesforce URL.A question with the Unique ID
CustomerNamepopulates the displayed customer name.
Link the Data Destination and Document to the form
-
From the Forms & Integrations menu, navigate to the form you want to set up.
-
Select EDIT FORM.
Result: The form opens in edit mode.
-
Select DESTINATIONS, and then select ADD A DATA DESTINATION.
Result: A list of your Data Destinations
A Data Destination specifies where to send data from a submitted form. You can use Data Destinations to automate data sharing and storage, routing data to a specific service (such as email or cloud storage) in several different formats. opens. -
Select the HTTP Data Destination that you configured.
Result: The system adds the Data Destination to your form. The system opens a page where you add Documents to the Data Destination.
-
In the Documents section, select the document you configured.
Tip:Remember to Save and Deploy the form when you’re ready to make it available to your field users.