Set Up Self-Registration
Users can create their own accounts through Self-Registration. An Admin user sets up Self-Registration for their team on the Subscription page. Once activated, self-registered users automatically become members of a specific user group, with access permissions predefined by the Admin user.
This topic describes how to set up Self-Registration. It also outlines security protocols you should follow to ensure only authorized users can access your forms and resources![]() Resources are materials that field technicians can access while they work on records in the Mobile App. A resource might be a Resource Document, like a manual or a floor plan, or a Resource Image, like a schematic or a diagram. Resources are uploaded to a FormSpace and can be referenced in forms or made available in the Resource Library..
Resources are materials that field technicians can access while they work on records in the Mobile App. A resource might be a Resource Document, like a manual or a floor plan, or a Resource Image, like a schematic or a diagram. Resources are uploaded to a FormSpace and can be referenced in forms or made available in the Resource Library..
Tip:This feature is available on request by contacting support@truecontext.com.
Available on all tiers:
Contents
Setup instructions: Self-Registration
Set up a Self-Registration group
When a user self-registers, TrueContext adds them to one or more default groups. You define the default groups when you set up Self-Registration.
Create a dedicated group for self-registered users. TrueContext recommends that you give this group no FormSpace![]() FormSpaces are where forms are stored and organized in the TrueContext Web Portal. A TrueContext Team may have multiple FormSpaces, depending on their needs. Admins can set FormSpace permissions to control which users have access to the forms in that FormSpace. permissions. This setup prevents self-registered users from accessing forms and resources until an Admin user confirms they are authorized. The Admin user can then move authorized users to groups with the correct FormSpace permissions for their work.
FormSpaces are where forms are stored and organized in the TrueContext Web Portal. A TrueContext Team may have multiple FormSpaces, depending on their needs. Admins can set FormSpace permissions to control which users have access to the forms in that FormSpace. permissions. This setup prevents self-registered users from accessing forms and resources until an Admin user confirms they are authorized. The Admin user can then move authorized users to groups with the correct FormSpace permissions for their work.
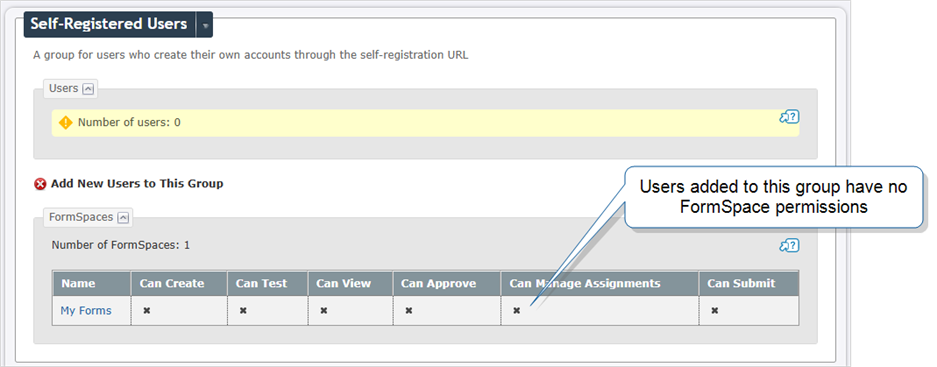
The topic Manage Groups: Setup instructions: Create a group describes how to create groups in more detail.
Add Self-Registration to your subscription
-
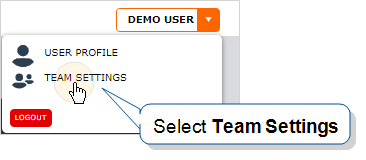
Go to User menu > Team Settings > Billing and Usage, and then select a subscription.
-
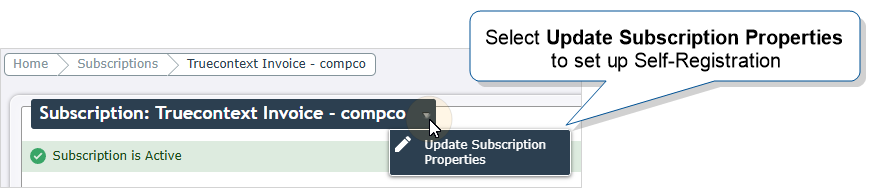
Hover over the arrow next to the subscription name, and then select Update Subscription Properties.
-
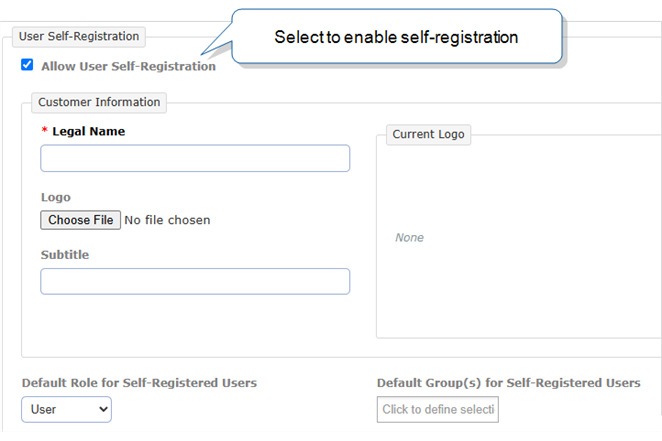
Select Allow User Self-Registration.
Result: The User Self-Registration section expands.
-
Enter the information you want to appear on the Self-Registration page. This ensures users know what the Self-Registration page is for. This includes:
-
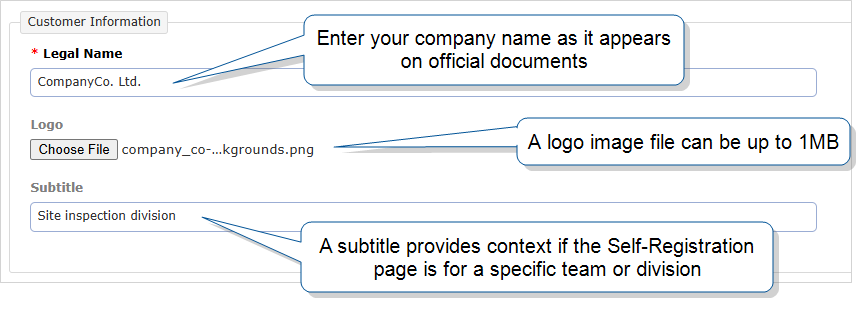
The legal name of your company as it appears on official documents. Your company name can be up to 255 characters.
Info:The section Legal Name guidelines describes company name requirements in more detail.
-
(Optional) A team or company logo. The logo must be in PNG or JPEG format, and it must not exceed 1MB.
-
(Optional) A subtitle. If the Self-Registration page is for a specific team, business unit, or division within your company, a subtitle provides that context. The subtitle can be up to 255 characters.
-
-
Select a default role for self-registering users, usually Mobile-only. If self-registered users need to access submitted records, you can assign
 Assigning and reassigning control which users are responsible for dispatched records. A dispatcher with the "Can Manage Assignments" FormSpace permission can assign a record to a user or group and reassign it if the original assignee is unavailable. Field users can also claim unassigned records from the Group Inbox. a different user role.
 -
Select one or more default groups for self-registering users.
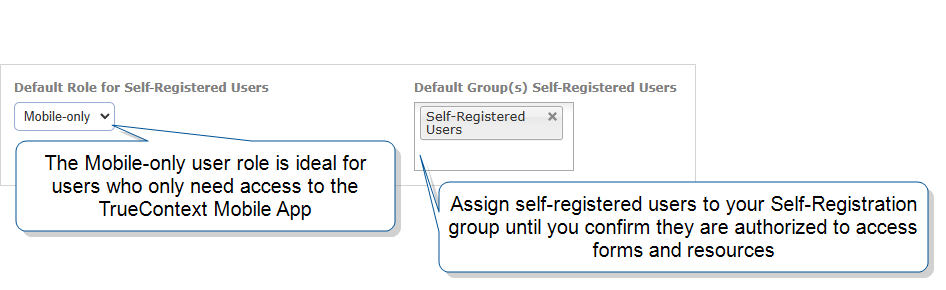
Note:For added security, the default group should be the dedicated group you created with no FormSpace permissions. Once an Admin user confirms a self-registered user is authorized, they can reassign the user to a group that has the appropriate FormSpace permissions.
-
Review the Default Required Fields. Every user provides these fields during Self-Registration: email, first name, last name, and password. You can't change the default required fields.
-
(Optional) To require more information from self-registered users, select the Additional Required Fields field. Choose one or more fields.
You can require the following additional fields:
- Department
- Organizational Unit Name
- Sub-Region
- Branch
- Branch Office
- Office
- Division
- Address
- Phone Number
- Manager Name
- Manager Email
- Title
- Company
- Region
-
Read and consent to the Admin authorized personnel agreement. By consenting to this agreement, you, the customer, confirm that:
- Appropriate security measures have been taken to ensure that the URL to the Self-Registration page is only provided to personnel authorized by the customer,
- Only authorized personnel use the TrueContext service, and
- TrueContext will have no responsibility to verify whether such personnel have been authorized by the customer to be a user of the TrueContext service.
-
Select Update.
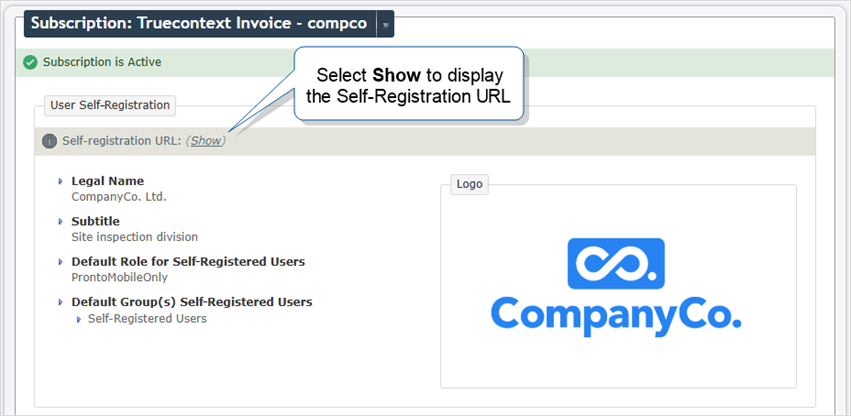
Result: The system generates a Self-Registration URL.
-
Select Show to display the full URL to the Self-Registration page. Share the URL with authorized personnel as necessary.
Tip:You can copy the URL text or download a QR code to embed in a webpage or document. A user can scan the QR code with their device camera to open the Self-Registration page on their device.

Info:The topic Self-Register with TrueContext describes how users create their own accounts with Self-Registration.
Legal Name guidelines
The Legal Name field captures the official name of your company as registered with your government or legal entity. An accurate Legal Name ensures users associate their Self-Registration process with your organization. Respect the following guidelines when you enter the Legal Name of your company for Self-Registration:
-
Enter your company name as it appears on official documents. Official documents include invoices, tax forms, and government filings. Enter the full name of your company. Don’t use abbreviations or nicknames, and don’t use a shortened version of your company name.
For example, if your company is called Company Co Ltd., don’t shorten it to CC Ltd.
-
Include suffixes like LLC, Ltd., or Inc. if the legal name of your company includes one.
-
Avoid non-essential symbols like emojis or special characters that are not part of your company name.
Reassign self-registered users
An Admin user should review self-registered user accounts before giving users access to forms and resources.
Note:The customer is responsible for ensuring all self-registered users are authorized by the customer.
-
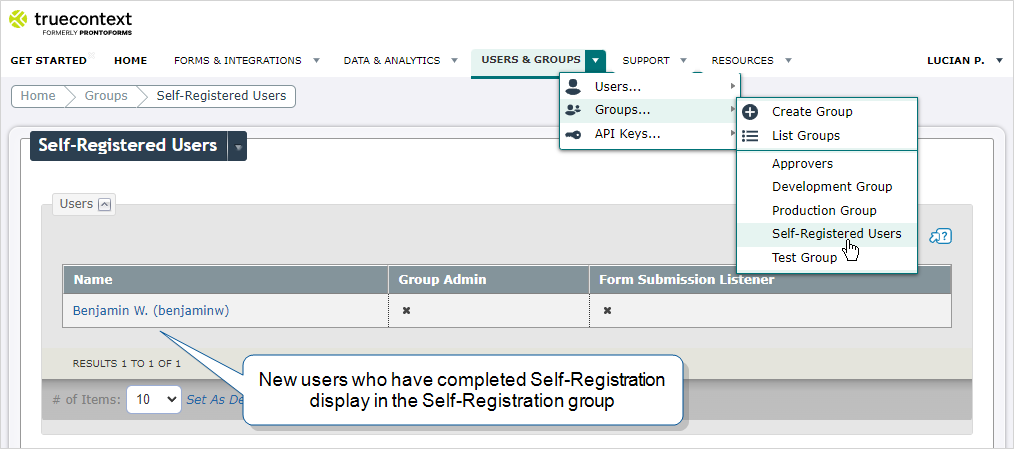
Monitor users that have joined the Self-Registration group. You can do this in two ways:
-
Select Users & Groups > Groups > GroupName, and check for new users that have joined the Self-Registration group.
-
Select Users & Groups > Users. Hover over the arrow next to Users, and then select Export Users to CSV. The Self-Registration column has a value of TRUE for users that self-registered. You can also check the Group Names column to see users assigned to the initial self-registration group.
-
-
Reassign
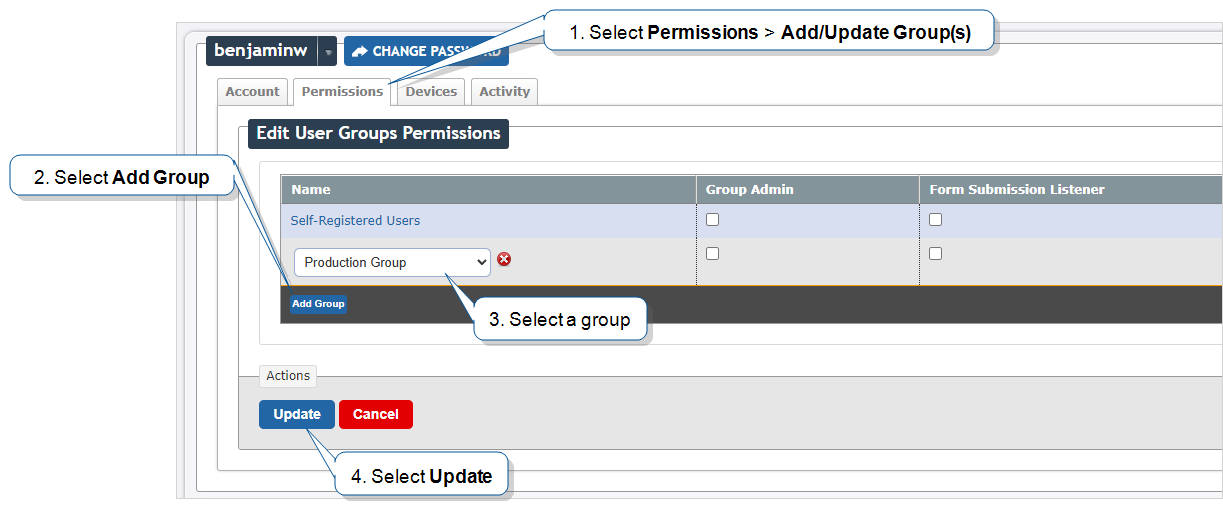
Assigning and reassigning control which users are responsible for dispatched records. A dispatcher with the "Can Manage Assignments" FormSpace permission can assign a record to a user or group and reassign it if the original assignee is unavailable. Field users can also claim unassigned records from the Group Inbox. new self-registered users to groups with FormSpace permissions defined by a Team Admin. This gives authorized users access to the forms and resources for the work they will do.Select a self-registered user, and then select Permissions > Add/Update Group(s).
Result: The Edit User Groups Permissions page opens.
-
Select Add Group, and then choose a group that has the appropriate FormSpace permissions.
-
Do you want to add the user to another group?
-
If yes, repeat step 3 for each new group.
-
If no, go to step 5.
-
-
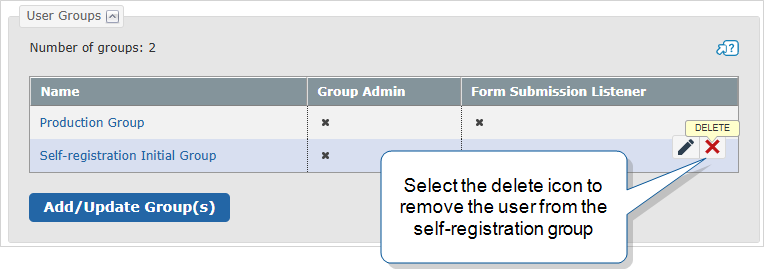
Once you've assigned the user to the relevant groups, you can remove them from the group that you set up for self-registration. To remove the user from that group, hover over the row and select the delete icon.
-
Select Update.