Manage Groups
Groups control which forms, resources![]() Resources are materials that field technicians can access while they work on records in the Mobile App. A resource might be a Resource Document, like a manual or a floor plan, or a Resource Image, like a schematic or a diagram. Resources are uploaded to a FormSpace and can be referenced in forms or made available in the Resource Library., and records your team can access and what actions they can perform. Users must belong to groups to access forms on mobile devices and perform tasks in the Web Portal. This topic describes how to create and manage groups, assign
Resources are materials that field technicians can access while they work on records in the Mobile App. A resource might be a Resource Document, like a manual or a floor plan, or a Resource Image, like a schematic or a diagram. Resources are uploaded to a FormSpace and can be referenced in forms or made available in the Resource Library., and records your team can access and what actions they can perform. Users must belong to groups to access forms on mobile devices and perform tasks in the Web Portal. This topic describes how to create and manage groups, assign![]() Assigning and reassigning control which users are responsible for dispatched records. A dispatcher with the "Can Manage Assignments" FormSpace permission can assign a record to a user or group and reassign it if the original assignee is unavailable. Field users can also claim unassigned records from the Group Inbox. FormSpace
Assigning and reassigning control which users are responsible for dispatched records. A dispatcher with the "Can Manage Assignments" FormSpace permission can assign a record to a user or group and reassign it if the original assignee is unavailable. Field users can also claim unassigned records from the Group Inbox. FormSpace![]() FormSpaces are where forms are stored and organized in the TrueContext Web Portal. A TrueContext Team may have multiple FormSpaces, depending on their needs. Admins can set FormSpace permissions to control which users have access to the forms in that FormSpace. permissions, and troubleshoot any access issues.
FormSpaces are where forms are stored and organized in the TrueContext Web Portal. A TrueContext Team may have multiple FormSpaces, depending on their needs. Admins can set FormSpace permissions to control which users have access to the forms in that FormSpace. permissions, and troubleshoot any access issues.
Note:Groups are the only way to give users access to forms. Users can only access forms when they belong to a group that has permissions in the FormSpace where those forms are stored.
Available on all tiers:
Contents
How groups and permissions work
Why groups are essential
Groups and the FormSpaces assigned to groups control user access:
- FormSpaces organize your forms, resources, and data into logical collections based on business needs.
- Groups organize your users by function or business unit.
- FormSpace permissions determine what actions each group can perform.
How permissions work
Mobile users can only access forms if their group has permissions in the FormSpace that contains those forms. Similarly, Web Portal users need the correct FormSpace permissions to view data, manage assignments, or perform other tasks.
Info:The topic FormSpace Permissions describes the different types of permissions in detail.
Default groups
All new TrueContext teams are created with two groups:
- Production Group: For deployed forms used in daily operations. New users are automatically assigned to this group.
- Test Group: For testing Draft forms before deployment.
You can use these groups as-is, modify them, or create new groups based on your team's needs.
Setup instructions: Create a group
Prerequisites
-
Admin user role (team admin) in TrueContext.
Info:There are two different levels of group management permissions:- Team admins can create, delete, and fully manage groups.
- Group admins can only add and remove users from existing groups they manage.
The topic Permissions Quick Reference: Web Portal permissions for user and group management describes group admin permissions in more detail.
-
Understanding of your team structure: Which users need access to which forms and data.
-
FormSpace organization: Forms, resources, data, integrations, and generated outputs organized into FormSpaces that reflect your team's access patterns and workflow needs—such as by region, business unit, service territory, customer type, or equipment specialization.
-
TrueContext Users: Users on your TrueContext team that you want to add automatically or manually to the group.
Create a group and assign users
-
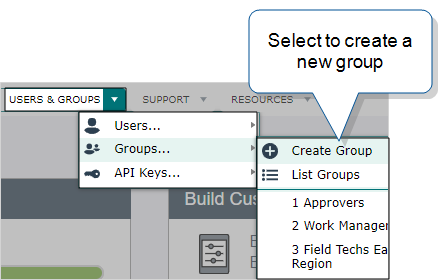
Go to Users & Groups > Groups > Create Group.
-
Enter the group information:
-
Name: Required. Choose a descriptive name that reflects the group's purpose (for example, "Field Technicians," "Supervisors," "Quality Inspectors").
-
Description: Optional. Add details about the group's purpose or which users should belong to it.
-
-
Add users to the group:
-
Click in the Selected Users field, and then select a user from the list. Repeat this step to add more users.
-
To remove a user from the group, select the "x" next to the user name.
-
-
You can set up the group so that new users created on your team are automatically added to this group. Do you want to do this?
-
If yes, select Add New Users to This Group.
Note: Users in this group have access to all Active, Draft, and Archived Forms forms and resources in the FormSpaces assigned to this group.
-
If no, go to the next step.
-
-
Assign FormSpaces to the group:
-
Click in the Selected FormSpaces field, and then select a FormSpace from the list. Repeat this step to add more FormSpaces.
-
To remove a FormSpace from the group, select the "x" next to the FormSpace name.
Info:By default, new groups have Can Submit FormSpace permissions. You assign specific FormSpace permissions after you create the group.
-
-
Select Create to save the new group.
Result: The group details page opens and displays the setup that you saved.
Assign FormSpace permissions
After creating the group, you can add or change the FormSpace permissions.
-
Are you still on the group details page?
-
If yes, go to step 3.
-
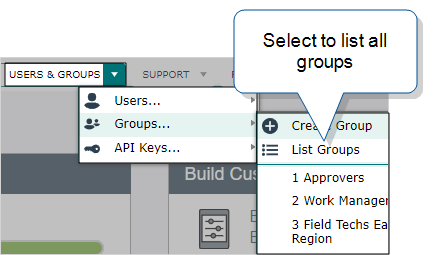
If no, go to the group details page: Users & Groups > Groups > List Groups.
-
-
Select the name of the group you just created.
Tip:You can use the Search option to find the group by name.
Result: The group details page opens.
-
Hover over the arrow next to the group name, and then select Edit FormSpace Permissions.
-
For each FormSpace, choose the appropriate permissions.
The following table lists the different FormSpace permissions and the actions that each permission allows.
Permission Actions allowed When to use Relevant user roles Can Create -
Create, edit, or delete a
- Form Definition
 A Form Definition is a template for an actual form or record that field users interact with. Using the Form Builder, you define the structure, layout, fields and data types, and logic of a form. A Form Definition also specifies resources available to users on their devices, such as Images and Documents, and mappings for data brought in from external sources.
- Data Destination A Data Destination specifies where to send data from a submitted form. You can use Data Destinations to automate data sharing and storage, routing data to a specific service (such as email or cloud storage) in several different formats.
- Data Source Data sources, also known as "Lookups", are external sources of data that you upload or connect to TrueContext. You can reference this data in a form to populate answers or answer options. Data sources save typing, reduce errors, and make it easy to provide mobile users with only the relevant, most current data.
- Document
- Resource
- Form Definition
- Archive an active Form Definition
- Dispatch The term "dispatch" refers to the act of sending a form to a mobile user or customer. Typically, a dispatched record includes some information pre-filled to give the recipient context for the work to be done. Dispatch can be manual or automated (using a Dispatch Data Destination or the TrueContext REST API). a form to one or more users
Give this permission to users who are authorized to build and edit Form Definitions and to dispatch forms to field users.
Tip:Admin users have this permission built-in for all FormSpaces.
Users Can Test Open and submit test versions of forms. These are forms based on Draft Form Definitions.
Set this permission so that specific users can test forms before you make them available for general use. - Mobile-only users
- Users
- Admin users
Can View -
View and download records dispatched to or submitted by other users.
-
Unassign and Assign incomplete TrueContext Teamwork
TrueContext Teamwork is a feature that enables mobile users to transfer incomplete forms for other users to complete as part of a multi-user workflow. This can be useful for jobs that require someone else's expertise or that span multiple shifts.-enabled forms. Intelligent Elite -
Send a submitted record for editing.
-
Access Work History.
Apply this permission to supervisory groups who need to manage their team’s work.
Tip:Admin users have this permission built-in for all FormSpaces.
Users Can Submit -
Open and submit an Active form on the Mobile App.
-
In the Mobile App, search for and edit submitted records.
-
Send or transfer (submit) a TrueContext Teamwork-enabled form. Intelligent Elite
-
Claim a TrueContext Teamwork-enabled form submitted as incomplete. Intelligent Elite
Apply this permission to all Field Technicians who require form access to complete their work.
Tip:All groups have the Can Submit permission preselected by default.
- Mobile-only users
- Users
- Admin users
View and export your own submitted records.
-
Users
-
Admin users
Can Approve Intelligent Elite
-
Claim a submitted record to review.
-
Approve a submitted record.
-
Request changes to a submitted record.
-
Withdraw approval from a completed record.
Apply this permission to approver groups who are responsible for reviewing and approving work. -
Users
-
Admin users
Can Manage Assignments -
Send a new or previously dispatched record to a mobile user.
-
Send a new or previously dispatched record to a mobile user, Group, or FormSpace. Intelligent Elite
Apply this permission to Users who need to create and manage work.
Tip:Admin users have this permission built-in for all FormSpaces.
-
Users
-
Admin users
Info:The topic Permissions Quick Reference includes a detailed list of the actions that users can take in TrueContext and the permissions that they need.
-
-
Select Update to save your changes.
Verify the group setup
After creating and configuring the group:
- Check that users can see the expected forms on their mobile devices.
- Test that Web Portal users can perform their required tasks.
- Review the group's FormSpace permissions to ensure they align with user roles.
Manage existing groups
Prerequisites
- You must have the Admin user role (team admin) in TrueContext.
- To add or remove users, if you're not a team admin, you must be a Group Admin.
How to make changes to existing groups
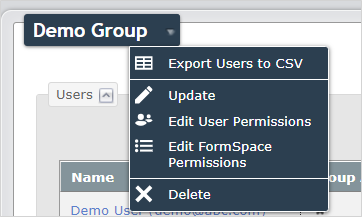
| To… | Go to group details > group name… |
|---|---|
|
Change group details, including:
|
Update |
| Set up group administrators | Edit User Permissions |
| Change FormSpace permissions | Edit FormSpace Permissions |
| Delete a group | Delete |
Change group details
Use the group Update option to:
- Change the group name and description.
- Add or remove users.
- Select or clear the option to automatically Add New Users to This Group.
- Add or remove assigned FormSpaces.
-
Go to the group list: Users & Groups > Groups > List Groups.
Result: The Groups page displays all groups in your team.
-
From the Groups page, select the name of the group you want to update.
-
From the group dropdown menu, select Update.
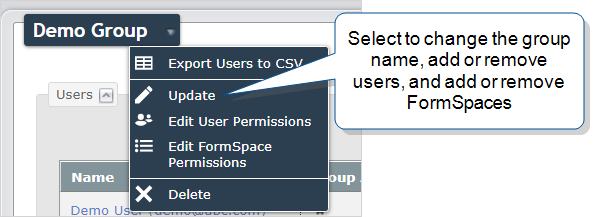
-
Make the required changes, and then select Update to save your changes.
Note: Removing users from a group immediately removes their access to the FormSpaces assigned to that group.
Set up group administrators
Admin users (team admins) and users identified as Group Admins can:
- Add or remove users from a group.
- Identify users as Form Submission Listeners. Email data destinations can be set up to automatically send data to Form Submission Listeners (such as supervisors or managers).
-
Go to the group list: Users & Groups > Groups > List Groups.
Result: The Groups page displays all groups in your team.
-
From the Groups page, select the name of the group you want to manage.
-
From the group dropdown menu, select Edit User Permissions.
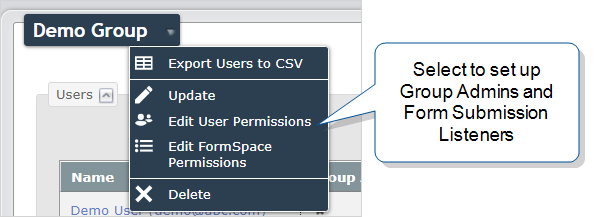
-
Select the users you want to be Group Admins and the users you want to be Form Submission Listeners. Users can be either or both.
-
Select Update to save your changes.
Change FormSpace permissions
-
Go to the group list: Users & Groups > Groups > List Groups.
Result: The Groups page displays all groups in your team.
-
From the Groups page, select the name of the group you want to manage.
-
From the group dropdown menu, select Edit FormSpace Permissions.
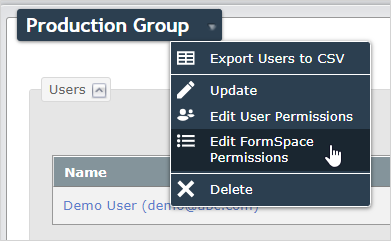
Result: The FormSpace Information page opens and displays a list of FormSpaces assigned to the group.
-
For each FormSpace listed, select the permissions that you want the group to have.
-
Select Update to save your changes.
Delete a group
Before you delete a group, you might want to:
- Assign users to other groups.
- Verify that users won't lose access to forms, data, or records they need.
- Check whether any automated processes, such as Data Sources Data sources, also known as "Lookups", are external sources of data that you upload or connect to TrueContext. You can reference this data in a form to populate answers or answer options. Data sources save typing, reduce errors, and make it easy to provide mobile users with only the relevant, most current data., Data Destinations A Data Destination specifies where to send data from a submitted form. You can use Data Destinations to automate data sharing and storage, routing data to a specific service (such as email or cloud storage) in several different formats., or scheduled CSV exports depend on the group.
-
Go to the group list: Users & Groups > Groups > List Groups.
Result: The Groups page displays all groups in your team.
-
From the Groups page, select the name of the group you want to delete.
-
From the group dropdown menu, select Delete.

Result: The system prompts you to confirm the deletion.
-
Select Ok to delete the group.
Result: The Groups page displays a list of remaining groups.
Troubleshoot group access issues
Users can't access forms on mobile devices
Problem: Users report they can't see forms on their mobile devices.
Solution:
- Verify the user belongs to a group that has permissions in the FormSpace containing the forms.
- Check that the forms are Active, not Draft A draft form is a partially filled-out form saved on a device, or a preliminary version of a form that's been saved but not deployed in the Form Builder..
- Confirm the user has reconciled their mobile device recently.
- Review the group's FormSpace permissions to ensure they include Can Submit at minimum.
Web Portal users can't perform required tasks
Problem: Users can't view data, manage assignments, or perform other Web Portal functions.
Solution:
- Check the user's role (Admin, User, or Mobile-Only).
- Verify the user belongs to groups with appropriate FormSpace permissions.
-
Review the specific permissions required for the task:
- Can Approve: Required to approve submitted records.
- Can Manage Assignments: Required to dispatch forms.
- Can Test: Required to test Draft forms.
New users aren't getting expected access
Problem: New users don't have access to the forms they need.
Solution:
- Check if the user was added to the correct groups during account creation.
- Verify that groups have Add New Users to This Group enabled if automatic assignment is expected.
- Manually add the user to the appropriate groups if needed.
- Confirm the groups have the correct FormSpace permissions.