Standard layout options for PDF/Word/HTML documents
Available on all tiers:
Contents
About
PDF, Microsoft Word, and HTML documents are the most commonly used document types. Set up formatting guidelines to control the document's page size, page breaks, font color, the arrangement of images, etc.
Info: The topic Creating and Managing Documents describes how to customize document names.
Formatting Options
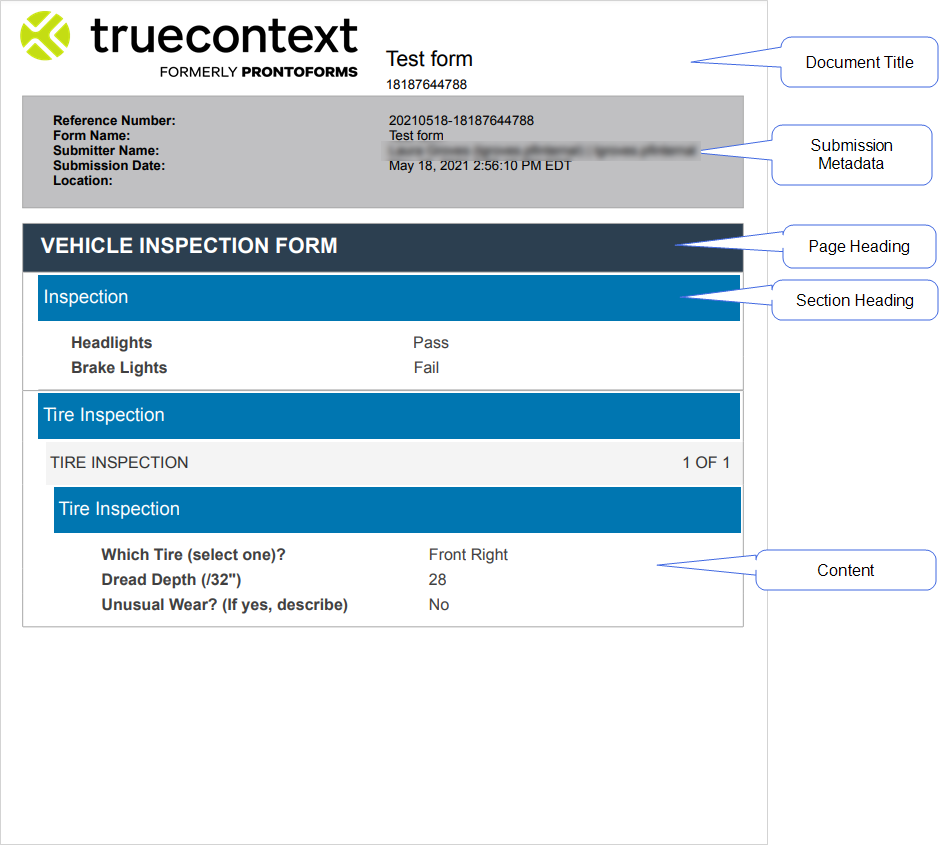
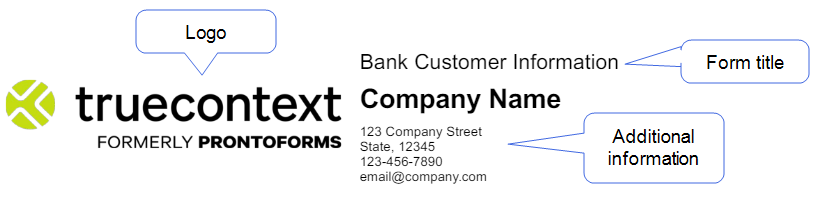
These options control the appearance of the document. Shown in the image below are the main parts of the documents that can be controlled.
Global Settings
These settings apply to the entire document.
Paper

-
Paper Size: Choose the rendered page size -- "Letter", "Legal", or "A4".
-
Paper Orientation: Choose between Portrait or Landscape.
Page Breaks
Choose when the document will break to a new page. This is helpful for organizing the document for its viewers, although settings other than "Auto" will increase the length of the document.
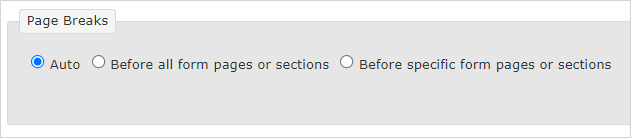
Auto
If chosen, the document will break to a new page automatically, whenever there is no longer room to print the next lines of data. Choose this option for the most efficient use of space.
Before all form pages or sections
If chosen, a new dropdown will appear below.
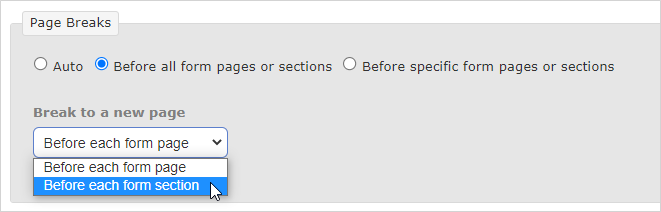
Break to a new page: Choose whether the document will break to a new page before showing the next form page, or if should break to a new page before each new form section.
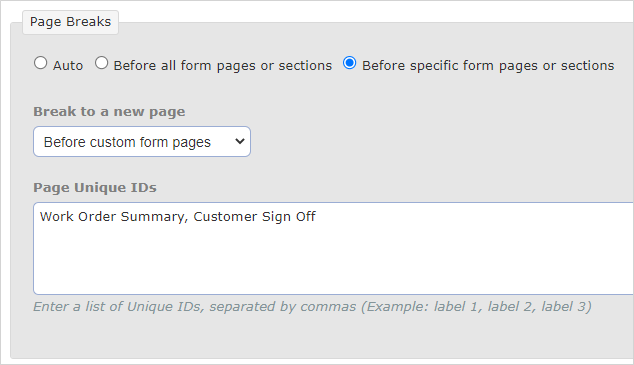
Before specific form pages or sections
This option allows you to customize when the document breaks to a new page. This is useful if certain information from your form is required to all show on the same page, like a summary.
-
Break to a new page: Choose whether the document will break to a new page before showing specific form pages, or form sections.
-
Page or Section Unique IDs: Enter a comma-separated list of page Unique IDs (or section Unique IDs, if you chose to break before custom form sections). Find more information on Unique IDs.
Document Layout
These settings control which of the following areas of the document are visible, as well as the data they contain and their appearance.
-
Document Header
-
Document Title
-
Submission Metadata
-
Document Footer
Document Header
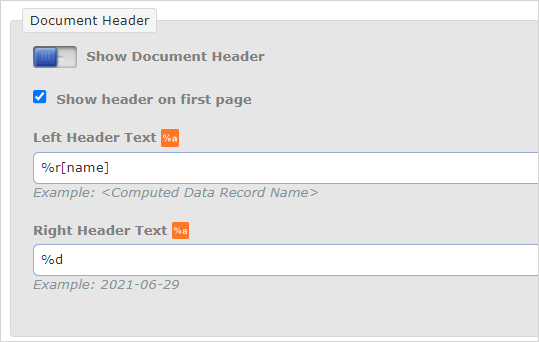
Options
-
Show Document Header: Controls if the document has a header or not. If turned off, none of the below settings are available.
-
Show header on first page: Controls if header text appears on the first page. If cleared, the header text appears only on the second page and subsequent pages, if there are any.
-
Left Header Text: Use any combination of DREL and static text to specify a single line of text to be shown on the left of the header. Leave this empty if you do not want any text to show here.
-
Right Header Text: Use any combination of DREL and static text to specify a single line of text to be shown on the right of the header. Leave this empty if you do not want any text to show here.
Document Title
The document title typically contains the logo, and formatted information like the form name, a work order number, or the contact information for your business.
The Document Title shows in the document below the header (if enabled), and above Submission Metadata (if enabled). The Document Title will only appear on the first page of the document.
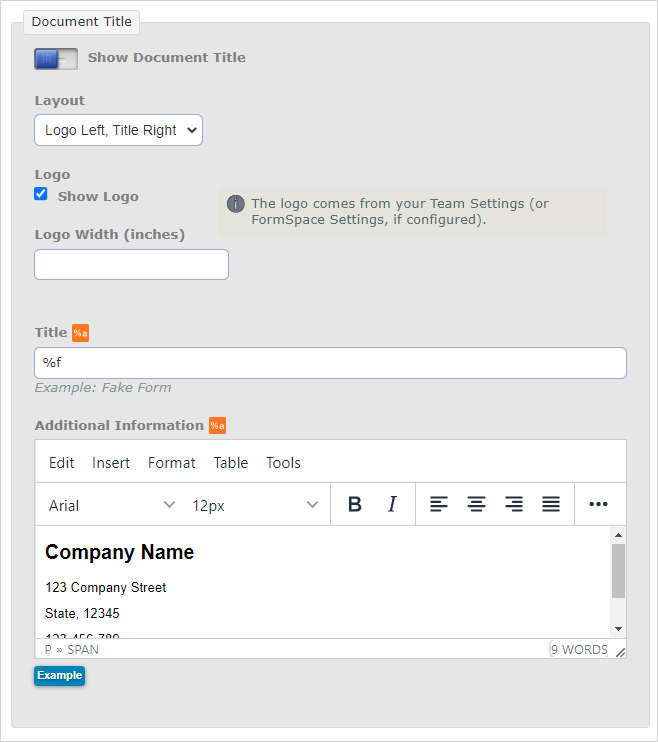
Options
-
Show Document Title: Controls if the document has a title or not. If turned off, none of the below settings are available.
-
Layout: Controls whether the logo should be on the left and the title on the right, or vice versa.
-
Show Logo: If On, the document will include the logo configured in your team-level Custom Branding. If you have a FormSpace
 FormSpaces are where forms are stored and organized in the TrueContext Web Portal. A TrueContext Team may have multiple FormSpaces, depending on their needs. Admins can set FormSpace permissions to control which users have access to the forms in that FormSpace.-level logo, it will use that instead. If Off, no logo will be shown.
 -
Title: Use any combination of DREL and static text to specify a single line of text to be shown in larger characters above the "Additional Information". Leave empty for no title.
-
Additional Information: Use the HTML editor to format any text you wish to include here. DREL, static text, images, and tables are all supported. Common pieces of information to include are Work Order or PO numbers, or company contact information.
Example:
Submission Metadata
This section includes information about the form submission.
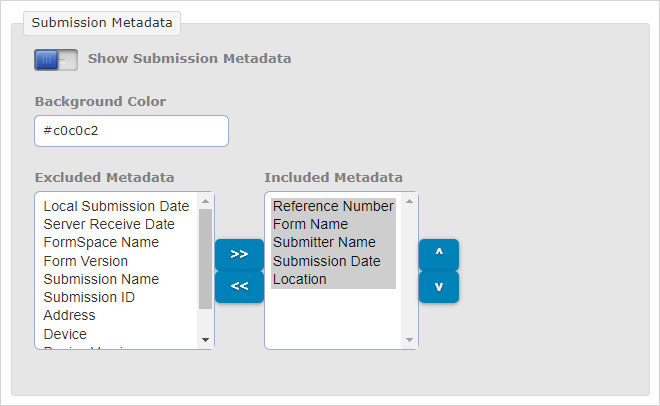
Options
-
Show Submission Metadata: Controls if the document has a metadata section or not. If turned off, none of the below settings are available.
-
Background Color: Choose a background color for this block. The only available text color is black, so ensure to choose a color light enough that your text will show on it.
-
Excluded/Included Metadata: These are the metadata options available to show in this block. Use the arrow buttons to move wanted options into the "Included" area.
-
Reference Number: The form submission's unique identifier in the TrueContext system. The first half shows the submission date, the second half shows the submission ID.
-
Submission ID: The second half of the reference number (see above) -- this is the "unique" part.
-
Submission Name: The Data Record Name of the form submission.
-
Form Name: The name of the form the submission was made for.
-
Form Version: The version of the above form that the submission was made against.
-
FormSpace Name: The name of the FormSpace the form is in.
-
Submitter Name: The Name and Username of the user who submitted the form.
-
Location: The Geolocation
Geo Location refers to the capture of location data in a form. A Geo Location question can act as a selector, where the user selects a location on a map, or as a stamp, which automatically captures the device's current location when a form page opens. Location data is classified as Fine (GPS) or Coarse (Network), depending on the accuracy of the source. from where the user was when they submitted the form. -
Address: The address extracted from the location (see above).
-
Submission Date: The date and time of submission, based on the Document Time Zone Source you select on the Document Basics tab.
-
Local Submission Date: The date and time of submission based on the time zone of the submitter’s device.
-
Server Receive Date: The date and time the server received the submission.
-
Device: The type of mobile device the form was submitted from.
-
Device Version: The software/OS version on the mobile device the form was submitted from.
-
Mobile App Version: The TrueContext Mobile App version used to submit the form.
-
Form Submission Status: The current status of the record as it moves through a workflow.
A SharePoint List Path cannot contain these characters: * : < > ? / \ |, or leading/trailing spaces. The "#" and "%" characters may also be blocked in some organizations unless administrator-enabled.
-
Workflow Status—The status of a dispatched or submitted record within your company’s workflow. The Workflow Status
The workflow status describes how a record moves through your company’s workflow. All statuses include a workflow state, and some also contain the data flow state or completion result. always lists a workflow state The workflow state describes the current stage in a workflow as a result of the last action taken on a record. For example, a record might have the workflow state "Dispatched"., and might include a data flow state A data flow state describes how data from a dispatched or submitted record moves between the Web Portal and the Mobile App. For example, a record might have a data flow state of "Downloaded". or completion state for additional context.Info:The topic Form Submission Workflow Status and States describes workflow states and data flow states in more detail.
The following options are specific to documents attached to forms set up with Approval Workflows.
-
Approver: The name and username of the user who reviewed and approved the record.
-
Approval Date: The date and time that the record was approved, in the Document Time Zone.
-
Approval Notes: Notes that the approver added when approving the record.
Note: If you attach the document to a form that doesn't require approval, the fields will be blank.
-
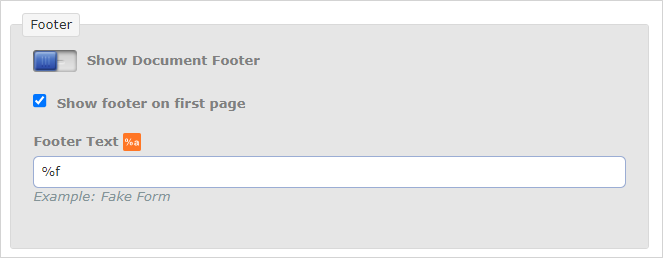
Document Footer
-
Show Document Footer: Controls if the document has a footer or not. If turned off, none of the below settings are available.
-
Show footer on first page: Controls if footer text appears on the first page. If cleared, the footer text appears only on the second page and subsequent pages, if there are any.
-
Footer Text: Use any combination of DREL and static text to specify a single line of text to be shown on the left of the footer. Leave this empty if you do not want any text to show here.
-
Page Number: If the footer is enabled, a document page count will appear on the right of the footer.
Appearance
This section controls the visual appearance of core parts of a form (pages, sections, and questions) in the document. This is a good opportunity to change colors to match your company's custom branding.
Control the appearance of:
-
Page Headings
-
Section Headings
-
Repeat Entry Headings
-
Content (answers and questions)
-
Table Layouts for Repeatable Sections
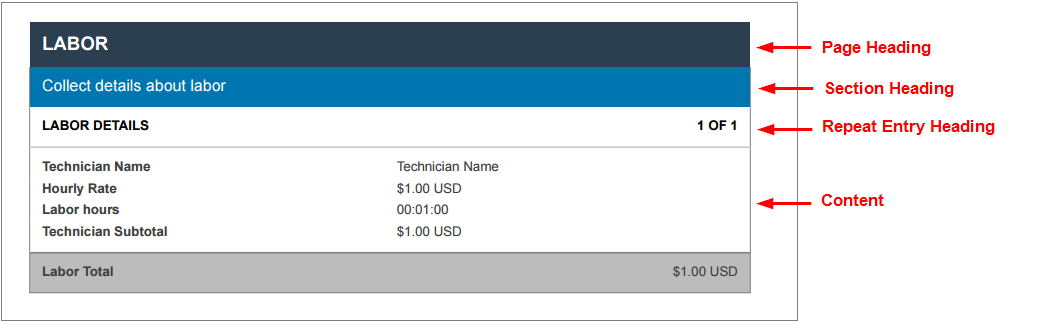
Table Layout for Repeatable Sections:
Page Headings
This controls how the name of the form's pages will be shown in the document.
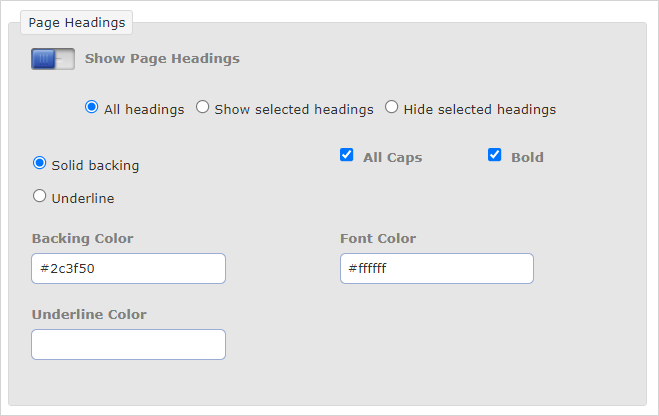
- Solid Backing/Underline: Controls if the page heading will have a solid colored background behind it, or if it will have a colored underline instead.
- All Caps: Will show the page name in all caps.
- Bold: Will show the page name in a bold font.
- Backing Color/Underline Color: Choose either the solid background color behind the page name, or the underline color.
- Font Color: Only available if you have a solid backing. We recommend black, white, or gray. Ensure there will be enough contrast with the backing color, so that the text will be easily readable.
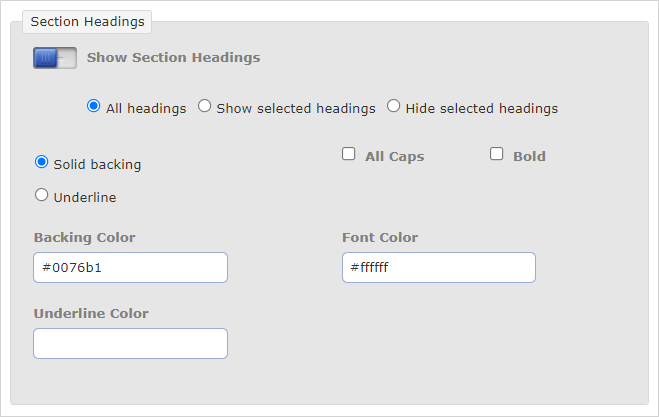
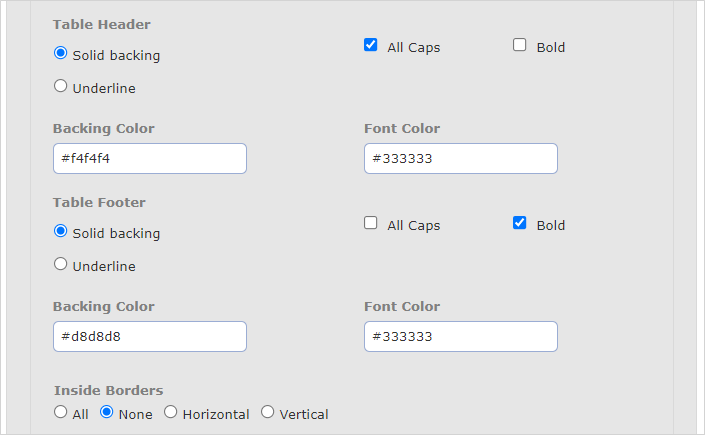
Section Headings
This controls how the name of the form's sections will be shown in the document.
-
Solid Backing/Underline: Controls if the section heading will have a solid colored background behind it, or if it will have a colored underline instead.
-
All Caps: Will show the section name in all caps.
-
Bold: Will show the section name in a bold font.
-
Backing Color/Underline Color: Choose either the solid background color behind the section name, or the underline color.
-
Font Color: Only available if you have a solid backing. We recommend black, white, or gray. Ensure there will be enough contrast with the backing color, so that the text will be easily readable.
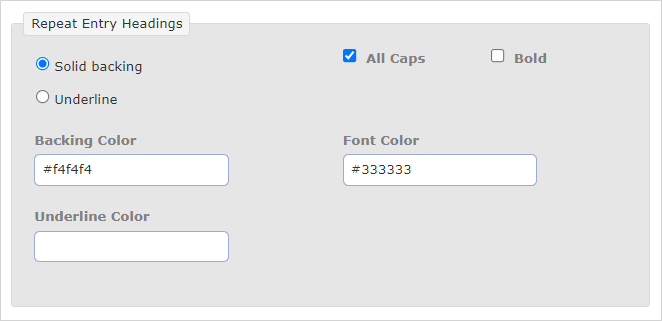
Repeat Entry Headings
This controls how the title for each entry into a repeatable section![]() A Repeatable Section is a subform that contains a set of related questions. The data captured is “repeating”, because the field user can complete the same subform more than once, which creates multiple entries. will be displayed.
A Repeatable Section is a subform that contains a set of related questions. The data captured is “repeating”, because the field user can complete the same subform more than once, which creates multiple entries. will be displayed.
-
Solid Backing/Underline: Controls if the heading will have a solid colored background behind it, or if it will have a colored underline instead.
-
All Caps: Will show the heading in all caps.
-
Bold: Will show the heading in a bold font.
-
Backing Color/Underline Color: Choose either the solid background color behind the heading, or the underline color.
-
Font Color: Only available if you have a solid backing. We recommend black, white, or gray. Ensure there will be enough contrast with the backing color, so that the text will be easily readable.
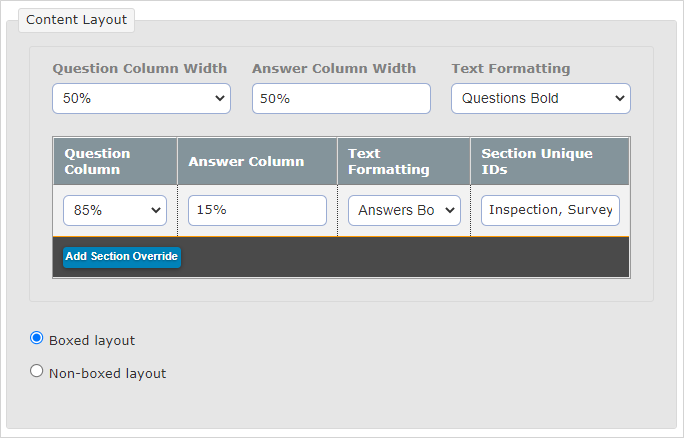
Content Layout
This controls how the questions and answers in your form will be displayed in the document.
-
Question Column Width/Answer Column Width: Controls how much of the page width will be given to the question text vs. the answer text.
-
Text Formatting: Make all question text bold, all answer text bold, or none of the text bold.
-
Section Overrides: This allows you to specify different answer/column widths for different sections of your form. For example, you may have one section with very long questions, and very short text. For this section, specify the above settings, then list the Unique IDs of each section you would like these settings to apply to.
-
Boxed/Non-Boxed Layout: Controls if there is a line/box around the questions and answers or not. Generally, if your section headings do not have a solid backing, a non-boxed layout looks better.
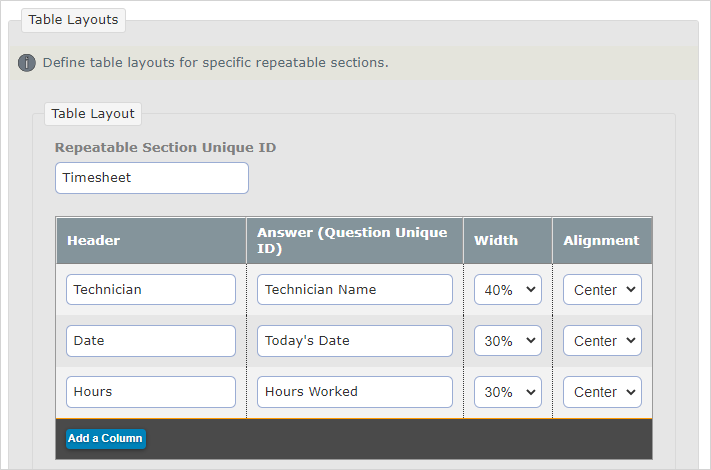
Table Layouts
This section allows you to lay out specific repeatable sections in your form as a table.
-
Select Add a Table Layout.
-
Enter the Unique ID for the Repeatable Section you want to lay out as a table.
-
Add columns to display. Enter whatever you'd like as the Header, and enter a single Unique ID per column. This is the question whose answers will be shown in the column.
-
Apply additional formatting as desired.
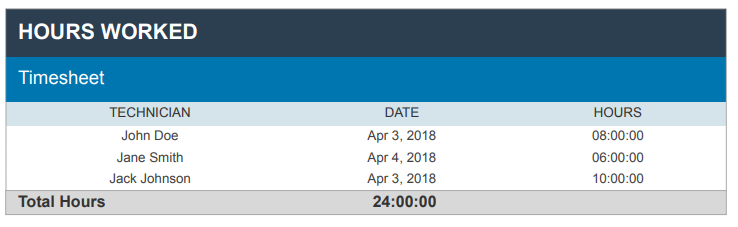
If your table layout is not working on your produced documents, double check that your Unique IDs are correct for both the section and the questions. See the picture below as a reference.

Answer Format
This section controls how the document displays different question types.
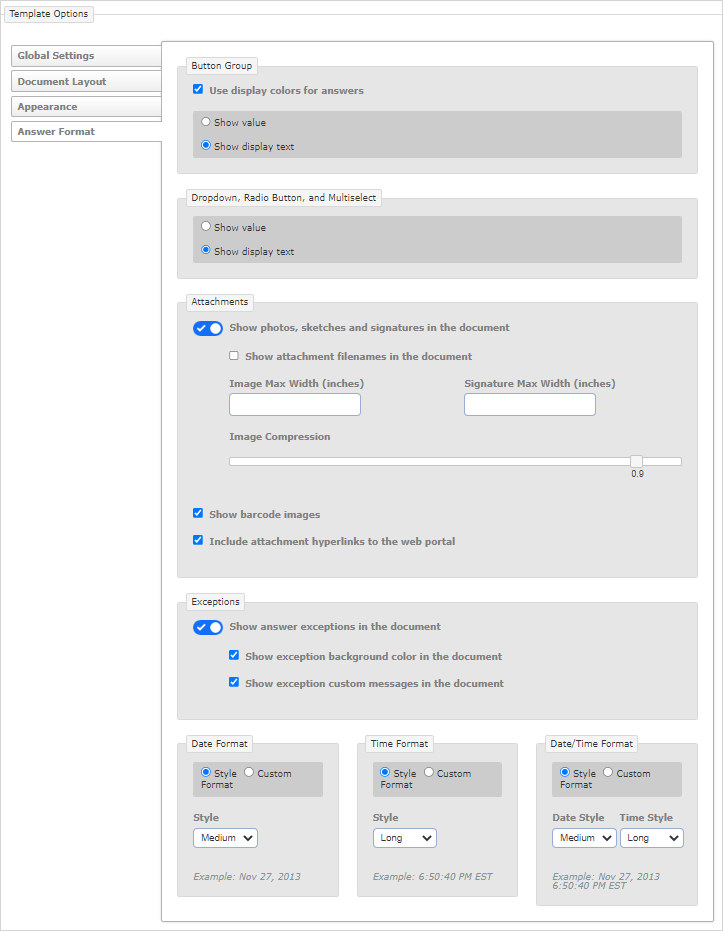
Button Group
You can use these options to customize how answers to Button Group questions display in the document.
-
Use display colors for answers: (Default) Button Group answers display in the same color as they do in the Mobile App. This helps you find an answer if your team uses Button Group colors to represent something specific, such as Pass/Fail inspection statuses.
-
Show value: The document shows the server value of the submitted answers. This may be different from the display text, depending on how you configure the answer options in the Form Builder.
-
Show display text: (Default) The document shows the display text of the submitted answers. This is the same text the technicians see in the Mobile App. This may be different from the server value, depending on how you configure the answer options in the Form Builder.
Dropdown, Radio Button, and Multiselect
Use these options to change how Dropdown, Radio Button, and Multiselect answers display in the document.
-
Show value: The document shows the server value of the submitted answers. This may be different from the display text, depending on how you configure the answer options in the Form Builder.
-
Show display text: (Default) The document shows the display text of the submitted answers. This is the same text that the technicians see in the Mobile App. This may be different from the server value, depending on how you configure the answer options in the Form Builder.
Attachments
-
Show photos, sketches and signatures in the document: If ON, these will be shown as images embedded in the document.
-
Show attachment filenames in the document: Print the filenames of attachments in the document, below the images. This is helpful if the attachments are also included as separate files when sent through a data destination, so they can be easily identified.
-
Image/Signature Max Width: Defining this limits the size of an image.
-
Image Compression: Adding compression reduces the size of the document. 0.9 compression is low compression, and 0.1 is highest compression.
Most documents should use 0.9 compression, which applies a small amount of compression and doesn't noticeably alter image quality. If you are encountering problems in generating documents, try increasing compression by lowering the number. If you are emailing or sending the images as separate attachments, the attachment will still be full-size; this setting only compresses images within the document.
-
Show barcode images: Will render any scanned barcode as an image, instead of just listing the barcode value.
-
Include attachment hyperlinks to the Web Portal: Any attachments can be selected to be viewed in the TrueContext Web Portal
The TrueContext Web Portal is a web application used to manage security settings, forms, FormSpaces, other users, Data Sources, and Data Destinations.. This will only work if the person viewing them has a TrueContext account with permissions to view the form submission.
Exceptions
Exceptions are used to categorize problems identified during the course of a field technician's work as the user completes a form.
-
Show answer exceptions in the document: If set to ON, answer exceptions will be shown in the document.
-
Show exception background color in the document: Enabling this will allow your selected exception colors to show in the document, adding color-coding in the same way it does for field technicians' work.
-
Show exception custom messages in the document: Enabling this shows any error messages you have configured and embeds them in the document if exceptions have been triggered.
Additional Comments
Form designers can use Additional Comments to ask for more details about an answer. If the answer meets specific criteria, the form prompts the field user for additional information. You can choose to hide Additional Comments in your documents. This is useful when you use Additional Comments for internal-only information and you want to exclude them from customer-facing reports.
Do you want your document to include Additional Comments?
-
If yes, keep the Show additional comments in the document toggle switched on.
-
If no, switch off the Show additional comments in the document toggle.
Info:The topic Additional Comments on Questions describes in more detail how additional comments work.
Date/Time Formats
This controls how answers that include dates and/or times will be shown in the document.
Style Format: Choose Short, Medium, Long or Full depending on how much detail should be shown.
| Short: | Date: 11/27/13 | Time: 6:50 PM |
| Medium: | Date: Nov 27, 2013 | Time: 6:50:40 PM |
| Long: | Date: November 27, 2013 | Time: 6:50:40 PM PST |
| Full: | Date: Wednesday, November 27, 2013 | Time: 6:50:40 PM PST |
Custom Format: Create custom date or time formatting using the following syntax.
| Date Formatting: | yyyy (Year) | MM (Month) | dd (Day) | ||
| Time Formatting: | hh (hour[12 hour syntax]) | a (AM/PM Marker) | HH (Hour[24 hour syntax] | mm (Minute) | ss (Second) |
| Timezone: | z (up to 4 z's) (Time Zone) | Z (up to 3 Z's) (Time Zone as Offset/City) |
Elements of this syntax can be combined. For example, "hh:mm a z" could output the time as "6:50 PM PST."