Find ID Values using the Web Portal
TrueContext assigns unique identifiers to forms, form versions, form submissions, users, documents, attachments, billing subscriptions, groups, and destinations. You’ll need unique IDs to complete certain tasks—such as calls to the TrueContext API or bulk dispatching. This topic describes how to find these ID values in the Web Portal.
Available on all tiers:
Contents
Find a Form ID
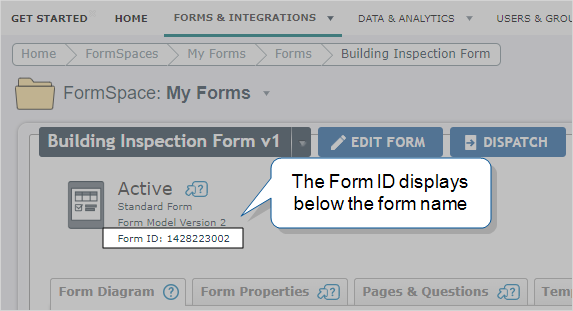
Select Forms & Integrations > FormName. The Form ID displays in the form details below the form name, as shown in the following example.

Find a Form Iteration or Version ID
-
Hover over the Forms & Integrations dropdown in the main navigation panel, and select List Forms.
-
Select the name of the desired form.
-
Hover over the form name dropdown and select Version History.
-
Select the desired form version.
-
On the following page, look at the address bar. The Form Iteration (or version) ID appears after "Iterations" (between the two forward slashes), as indicated in red in the screen capture below .

Info:The topic Form Versions describes form versions in more detail.
Find a User ID or Username
When dispatching a form from the TrueContext Web Portal![]() The TrueContext Web Portal is a web application used to manage security settings, forms, FormSpaces, other users, Data Sources, and Data Destinations. or via the TrueContext API, the dispatcher must indicate the ID values for the form and for the user who will receive the dispatch. As an alternative to the user ID, the username could be specified in the dispatch.
The TrueContext Web Portal is a web application used to manage security settings, forms, FormSpaces, other users, Data Sources, and Data Destinations. or via the TrueContext API, the dispatcher must indicate the ID values for the form and for the user who will receive the dispatch. As an alternative to the user ID, the username could be specified in the dispatch.
-
Hover over Users & Groups in the main navigation panel and select List Users.
-
Select the display name of the desired user to access their profile.
-
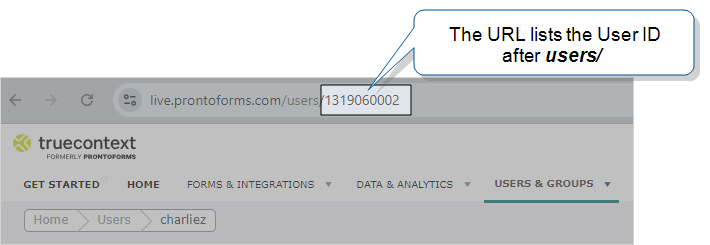
On the following page, look at the address bar. The User ID appears after "users" (between the two forward slashes), as indicated in red in the screen capture below.

-
The user's username appears on this page as well, as indicated in red below.

Find a Document ID
-
Hover over the Forms & Integrations dropdown in the main navigation panel and select Documents.
-
Click on the name of the desired document.
-
On the following page, look at the address bar. The Document ID appears after "documents", as indicated in red in the screen capture below.

Find a Form Submission ID
-
Hover over the Data & Analytics dropdown in the main navigation panel and select All Form Activity.
-
Select the Reference # of the desired form submission.
-
On the following page, look at the address bar. The Form Submission ID appears after the word "data" in the URL, as indicated in the following illustration.

Find an Attachment ID
-
Hover over the Data & Analytics dropdown in the main navigation panel and select All Form Activity.
-
Select the Reference # of the Form Submission where the desired attachment is.
-
On the following page, scroll down to the attachment image. Hover mouse over the image and look at the bottom of the browser window. The Attachment ID appears after "attachments", as indicated in red in the screen capture below.

Find a Billing ID
-
Go to YOUR NAME > TEAM SETTINGS.
-
Select the Billing and Usage tab.
-
Select the name of a subscription from the list.
Result: The Subscription details page opens, and the system displays the Billing ID in the URL.

Find a Group ID
-
Go to USERS & GROUPS > Groups… > List Groups.
-
Select the name of a Group from the list.
Result: The Group details page opens, and the system displays the Group ID in the URL.

Find a Destination ID
-
Go to Forms & Integrations > Data Destinations.
-
Result: The Data Destination details page opens, and the system displays the Destination ID in the URL.
