Integrate with ServiceMax
Available as an add-on for the Intelligent and Elite tiers:
Estimated Effort ~ 1-2 hours
Learning Objectives
After completing this unit, you will be able to:
-
Configure a connection between TrueContext and ServiceMax
-
Configure a User Defined Custom Action in ServiceMax
-
Launch the TrueContext Mobile App from the ServiceMax App, complete a form, updating the Work Order details in ServiceMax
Prerequisites
In order to configure an integration between TrueContext and ServiceMax, you will require:
-
An active ServiceMax subscription
-
The ServiceMax Go or ServiceMax FSA App installed on mobile devices
-
An active TrueContext account
-
The TrueContext Mobile App installed on mobile devices
-
A target form in TrueContext that will receive data from ServiceMax
-
A Work Order dispatched to your user in ServiceMax
Getting Started with ServiceMax
ServiceMax is the global market-leader in Service Execution Management, providing a cloud-based software platform that improves the productivity of complex, equipment-centric service execution for OEMs, operators, and 3rd-party service providers. ServiceMax FSM optimizes execution of both short cycle operations - emergency work, meter services, compliance jobs, maintenance and inspection-and long cycle operations, such as outage management, that encompass multiple days, tasks, and people.
Step-by-Step
Your Use Case - Launch a form in the TrueContext Mobile App that’s populated with data from ServiceMax
Here is a common use case: A technician who has been assigned a work order in ServiceMax must complete an extensive checklist in the TrueContext Mobile App.
In TrueContext
-
Create a Salesforce Connection between TrueContext and your ServiceMax org by navigating to Forms & Integrations > Connections
 A Connection is an integration point that's used to link a TrueContext Data Source or Data Destination to an external service to import or export data. Data Destinations and Data Sources that share the same external service can also share the same Connection. > Create Connection.
 -
Name the Connection, and select the FormSpace
FormSpaces are where forms are stored and organized in the TrueContext Web Portal. A TrueContext Team may have multiple FormSpaces, depending on their needs. Admins can set FormSpace permissions to control which users have access to the forms in that FormSpace. where the form to be dispatched to can be found. -
Establish your connection by clicking Connect, and entering your ServiceMax Admin user credentials.
-
Navigate to the form which you would like to Dispatch
The term "dispatch" refers to the act of sending a form to a mobile user or customer. Typically, a dispatched record includes some information pre-filled to give the recipient context for the work to be done. Dispatch can be manual or automated (using a Dispatch Data Destination or the TrueContext REST API). from the ServiceMax App. (Form > Pages & Questions Tab > Label column). You will need to reference the Question Unique IDs when setting up your User Defined Custom Action in ServiceMax.
In ServiceMax
-
Navigate to ServiceMax Setup in the ServiceMax Admin menu.
-
Navigate to Service Flow Manager > SFM Custom Actions.
-
Manage Customer Actions For > Select Work Order from the dropdown menu.
-
In User-defined Custom Actions click the New button.
-
Select your Action Type:
To integrate with the ServiceMax Go or FSA applications, proceed to a. App-to-App. If you are running ServiceMax in a browser on Windows and calling the TrueContext Mobile App Windows application, proceed to b. URL.-
App-to-App.
-
Action Title: <Name your action>
-
Action ID: <Give your action an ID>
-
Scheme Name: truecontext
Info:We're now TrueContext.Use
truecontext://ortcxt://in your App‑to‑App calls.To maintain existing integrations, TrueContext will continue to support
prontoforms://and the alternativehttps://prontofor.ms/.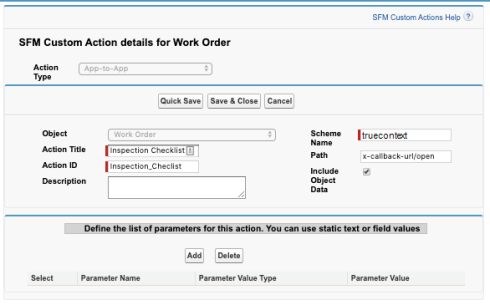
-
Path: x-callback-url/open
-
-
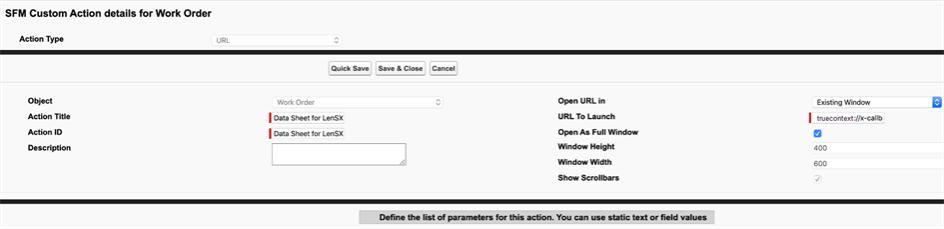
URL.
-
Action Title: <Name your action>
-
Action ID: <Give your action an ID>
-
Open URL in: Existing Window
-
URL to Launch: truecontext://x-callback-url/open
-
-
-
Define your Parameters Next, define the list of parameters to be sent from the ServiceMax app to the TrueContext Mobile App. The name parameter is required, and should be used to identify the correct form to be opened in the TrueContext Mobile App. In the example below, the form to be opened is called Inspection Checklist. All other parameters are mapped based on what data you wish to dispatch into the form, from the relevant Work Order in ServiceMax. The Parameter Name on the left hand side is the question Unique ID
A Unique ID refers to the specific identifier of a question, form page, form section, or Data Destination. Unique IDs are used as reference points when pulling data for conditional logic, Analytics projects, Data Destinations, and Documents..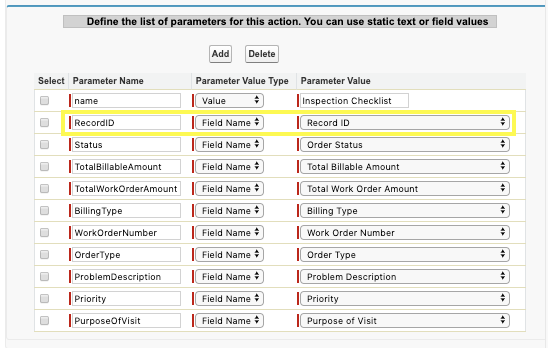
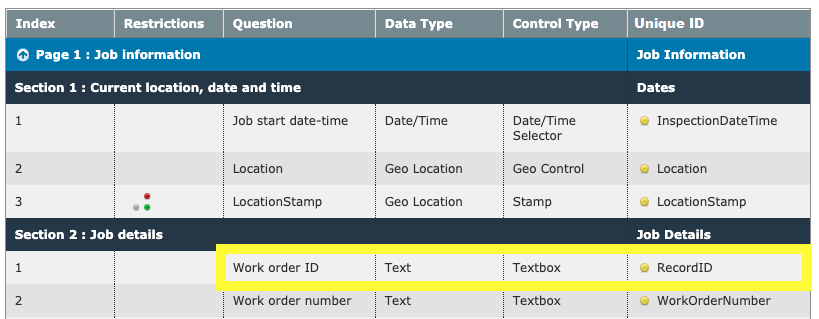
In this example, the Record ID (question Unique ID: RecordID, ServiceMax work order parameter value: Record ID) will be mapped to the question Work Order ID.
To send strings of text, select Value as the Parameter Value Type. To send the value which is stored within a field in the given Work Order in ServiceMax, select Field Name as the Parameter Value Type, and then select the ServiceMax field you wish to map.
Exclusively for use in App‑to‑App configurations, configure x-success, x-cancel, and x-error parameters with parameter value svmx://x-callback-url to bring the originating ServiceMax application back to the foreground upon a success, error or cancel event in the TrueContext Mobile App.
Note: These callback parameters are not compatible with a URL configuration. To return to ServiceMax, users must manually return to their browser.
-
When you have completed the mapping of your parameters, ensure that you Save & Close the page.
In ServiceMax - Add a new SFM Wizard Step
-
Navigate to ServiceMax Setup in the ServiceMax Admin menu.
-
Navigate to Service Flow Manager > SFM Wizards.
-
Select Object > Work Order.
-
Under the Custom SFM Wizards, select the Wizard which applies to your users, and click Edit.
-
Navigate to the Manage Wizard Steps tab, and click on the New Step button.
-
Wizard Step Type select Others.
-
Step Name select your action, as named in the Action Title above.
-
Title, enter the name of the step as you would like it to show up for your users in the ServiceMax app.
-
-
When you have completed the set-up of your FSM Wizard Step, ensure that you Save & Close the page.
In ServiceMax Go
-
Ensure that your configuration has synced to your device. Open the ServiceMax Go app, press More, in the bottom right hand corner. Sync > Run Configuration Sync.
-
Navigate to a Work Order assigned to the user you are logged in as. Open the Work Order, press the Work Order number to see the Work Order overview.
-
Open the burger menu in the bottom right hand corner. Your new User Defined Custom Action will appear in the Actions menu with the step name as defined by you in step 6 above.
-
Selecting the action will open the TrueContext Mobile App, taking you directly into the app, and dispatching the work order details, as per your configuration.
Troubleshooting Tips
A common approach to troubleshooting involves creating a new SFM custom action with only the truecontext://x-callback-url/open parameter configured. If the app launches successfully, then you can continue building from there. For more information on App‑to‑App communication, see the topic App‑to‑App Communication.